SewStylish

Archives for 2017

February 10, 2017 by Evamarie

Web Extra: Make Wrapped Loops

In SewStylish Spring 2017, author Susan Beal shows how to make pretty, one-of-a-kind hairpins and necklaces. Now, learn how to make wrapped loops–an essential technique to making your own jewelry.

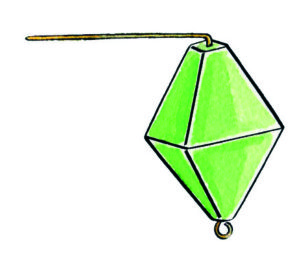
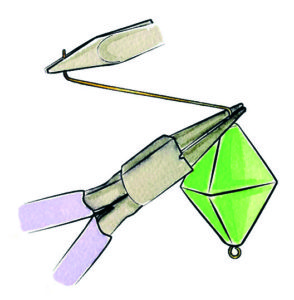
  1. Place a bead on the eyepin you’ve just created. Grasp the wire just above the bead with round-nose pliers, and make another neat 90-degree angle bend above and over the tips, holding the wire tail with flat-nose pliers.
  2. Next, adjust the round-nose pliers so they are gripping on either side of the wire bend, above and below it. Use the flat-nose pliers to pull the wire tail over the end of the round-nose pliers and all the way around, creating a circle with an extra tail of wire still extending beyond it.
  3. Use the flat-nose pliers to hold the circle while you grip the end of the wire tail with the round-nose pliers. 
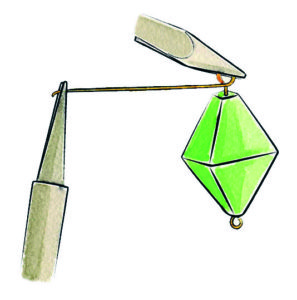
  4. Wrap the wire tail around the space above the bead, working from top to bottom to create a neat coil, and stop when you reach the top of the bead. If the wire coils on top of itself or starts to get messy, stop coiling and unwind it, then start again, going more slowly this time. If it’s really tangled or kinked, you can always start over with a new piece.
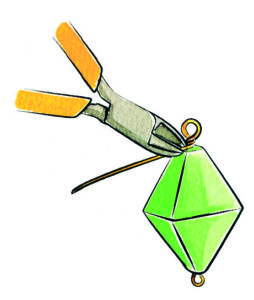
  5. Clip the end of the wire flush with the coil. Make sure the sharp edge isn’t sticking out—if it is, use flat-nose pliers to flatten and smooth it into the coil.

Tip: Practice with inexpensive craft wire until your loops are nice and even. Plain loops work best with thick wire (such as 20 gauge), while the more secure wrapped loops are good for thinner wire (24 gauge) but can also work well with thicker gauges, too.

Save

Save

Filed Under: web extras

February 10, 2017 by Evamarie

Download this Free Pocket Pattern

Pockets are practically essential, and they are easy to sew. The article “How to Add Pockets” in the Spring 2017 SewStylish digital issue offers step-by-step instructions for adding in-seam pockets to skirts. Here’s a PDF pattern piece you can use to cut pockets for your next sewing project.

Print the pattern piece on letter-sized paper with a portrait orientation. Measure the 1-inch registration square on your printout to make sure the pattern piece printed at the correct scale.


Click to download this free pocket pattern


Save

Save

Save

Filed Under: web extras Tagged With: pattern

February 10, 2017 by Evamarie

Sew-along Week 4: Transfer Test Garment Changes to Your Pattern

sewstylish.com sew-along week 4
Use the changes pinned into your muslin to customize your pattern.

The key to getting a great fit with a sewing pattern is to make a test garment, or “muslin.” You try it on to get a real idea of how the finished garment will look on your figure. Then you pin or let out the muslin’s seams to enhance the fit. Watch our video, “How to Fit a Test Garment,” to see the process in action with Simplicity SewStylish 8328 on our model, Penelope.

Here, I’ll show you the next step: how I transferred the fit adjustments we made to Penelope’s muslin to the pattern pieces.

Some sewers use the adjusted muslin as a pattern. That is just fine and it works well for many. I suggest making the changes to the pattern, however, for two reasons.

  • Too much handling can distort muslin fabric. You don’t want to mar the accuracy of the fitting adjustments you made.
  • The pattern tissue is marked with some useful information that will help you sew the garment, such as notches and markings. Let’s retain that information by using the pattern.

Gather your tools and supplies

You’ll need your pinned muslin, your pattern pieces, a red marker and a black marker, a seam ripper, a ruler or rulers (I keep a few handy – a 1-inch by 6-inch clear ruler, a 2-inch by 18-inch clear ruler, and a French curve), scissors (I use sharp embroidery scissors and paper scissors), and transparent tape.

sewstylish.com sew-along week 4
Collect the supplies you’ll need to copy the muslin alterations to the pattern pieces.

Note: If you are adding length or circumference to a pattern, you will also need pattern paper to fill in your pattern.

You want to work on a clean worksurface with room for full pattern pieces.

[Read more…]

Filed Under: sew-along Tagged With: muslin

February 9, 2017 by Evamarie

360° Views: Romantic Lace & Tulle Separates

Delicate lace and crinkle tulle create a soft and romantic version of Simplicity SewStylish 8328. The fun part is that these are separates, so you can pair the top or skirt with clothes from your closet. View D lace top in satin and lace, is shown with View F full-length skirt with a tulle overlay. Lace is from Mood Designer Fabrics, New York City. Satin and tulle are from Jo-Ann Fabric and Craft Stores.

Save

Save

Filed Under: 360-degree views

February 9, 2017 by Evamarie

360° Views: Dramatic Satin & Organza Ensemble

Rose-gold organza makes a entrance at any special event. Simplicity SewStylish 8328 View A top in satin paired with View F full-length skirt with an organza overlay. Fabrics are from New York Elegant Fabrics, New York City.

Save

Save

Filed Under: 360-degree views

  • « Previous Page
  • 1
  • 2
  • 3

Get free eletters and special offers

Sign Up

SewStylish is a special publication from the publishers of Threads magazine.

  • Home|
  • Contact Us|
  • Privacy Policy|
  • Terms of Use|
  • Accessibility

© The Taunton Press, Inc. All rights reserved.