SewStylish

April 11, 2017 by Sewstylish

Sew-along Week 6: Lap and Appliqué Lace Darts

Last week, I shared how to sew a dart in fabric for the Simplicity SewStylish 8328 View C top. Counting the bust darts, and the waist darts on front and back, this top has 12 darts to sew in the fabric and lining!

This post, however, focuses on two more darts, the most important of them all. They are the lace overlay bust darts. I’m going to show you a different technique for sewing darts in lace, a technique called lap and appliqué. It takes more effort, but the results are worth it.

Lace is special. It’s delicate, romantic, feminine, and dressy. You don’t want to sew it into thick, opaque layers, but keep it as airy and open as it should be.

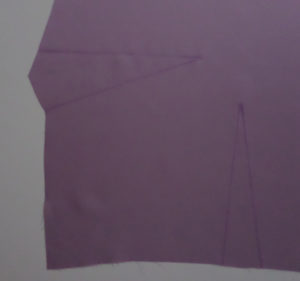
Why sew only bust darts in the lace overlay? Before we get started, I want to answer this question. Waist darts would break up the lovely lace selvage along the top’s overlay hem. The pattern designers simply shifted a little extra fabric into the bust dart value on the overlay, which will float over the slightly more fitted fabric layer of the top.

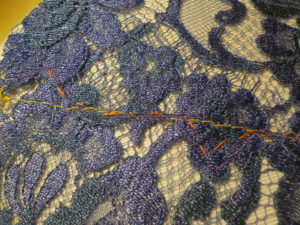
Use thread to mark the dart legs on lace

It’s difficult to make a mark on lace that is clear and removable. To get around that, I machine thread-trace the dart legs on the lace.

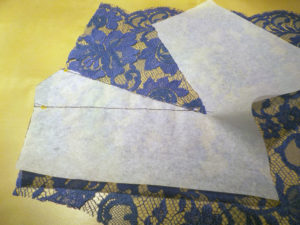
  1. Copy the dart onto a piece of tissue paper. Mark the dart as well as the pattern piece’s side-seam edge above and below the dart base. Trim the tissue to the side-seam edge marking.
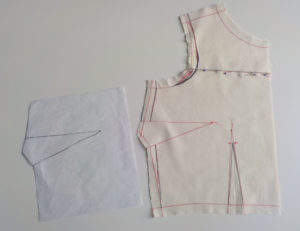
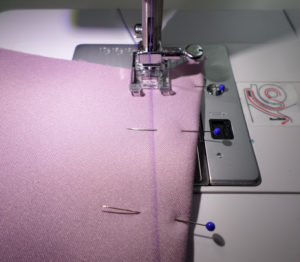
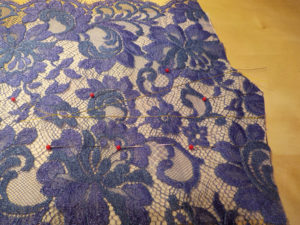
    Trace the dart onto tissue paper.
  2. Pin the marked tissue paper to the wrong side of the lace. I place the pins far enough from the dart legs that I don’t have to worry about removing them during sewing.
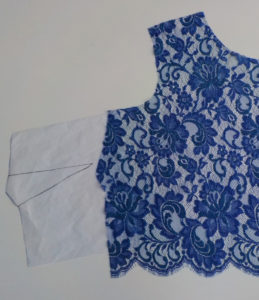
    Slide the tissue paper dart underneath the lace.
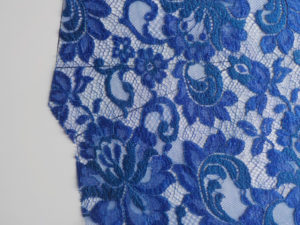
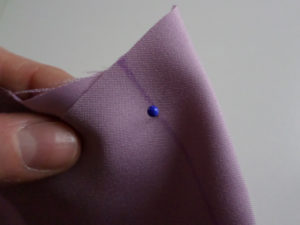
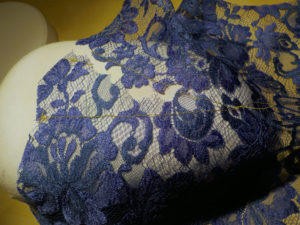
    You can see the dart marking through the lace.

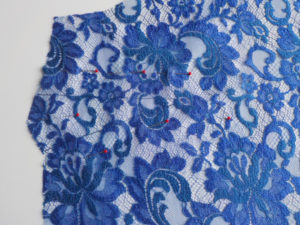
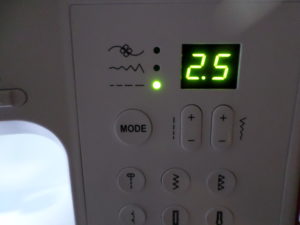
    Pin the lace and tissue paper together.
  3. Change your needle thread to a color that contrasts with the lace. You only need to change the needle thread. The bobbin thread can match the lace.
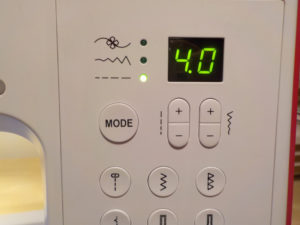
  4. Set the stitch length to 4 mm for a thread-tracing/basting stitch. Before you sew, test the basting stitch on a lace and tissue scrap! This is important. Make sure your sewing machine is happy and disinclined to eat the tissue paper or the lace.

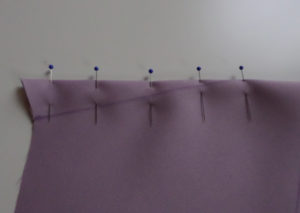
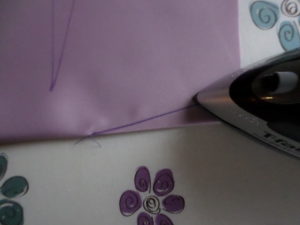
    Set a long stitch length for thread-tracing.
  5. Starting at the side-seam edge each time, baste the dart legs to the point. Don’t backtack or lockstitch at either end – you want to be able to remove the thread tracing later.

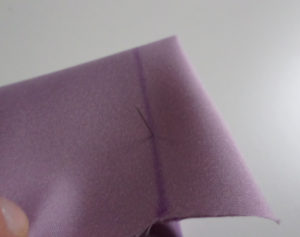
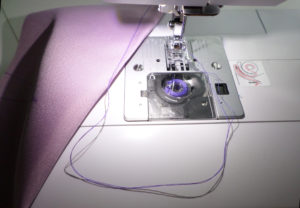
    The yellow thread shows up nicely, doesn’t it?
  6. Turn the lace over and carefully tear the tissue out of the basting stitches. Now the dart is clearly marked until you decide to remove the thread tracing.

    Remove the tissue paper from the lace’s wrong side.


Get set to lap and appliqué

I want to lap the bust dart’s upper leg over the lower leg, like a roof shingle. The appliqué edge is more likely to lie – and stay – flat that way.

  1. Select a motif to follow in the upper portion of the dart value. Most lace has a motif, for example the flowers  shown, set into a “ground” fabric that is like net. (Please note that this is a vast oversimplification of lace, which comes in many types. Find out more about lace varieties and how to sew them in our SewStylish Spring 2017 digital issue, in Threads back issues, or at ThreadsMagazine.com.) With a sharp pair of embroidery scissors, a pair that cuts to the tip, snip the threads connecting the motifs to the lace ground, following an approximation of the upper dart leg, to the dart point.
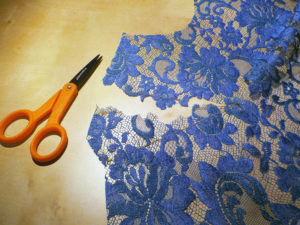
    Snip through the lace ground to create the appliqué edge.

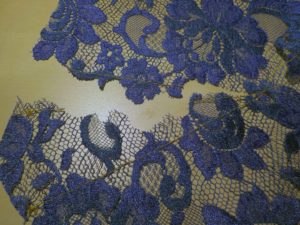
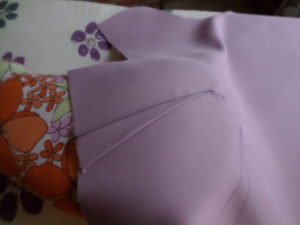
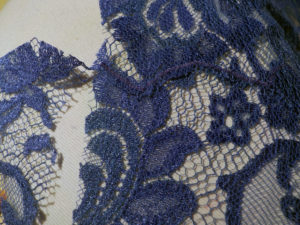
    Here is a closer look. It’s not important to follow the dart leg perfectly.
  2. Lap and align the upper dart leg over the lower dart leg. This is much easier done over a ham, which will support the dart’s shape.
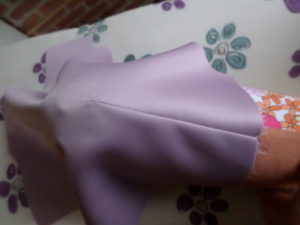
    Now for some sewing magic. The dart goes from this . . .
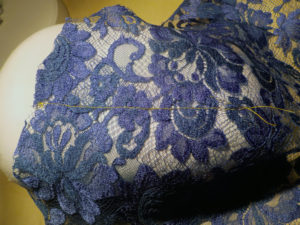
    . . . to this! It is hardly visible.
  3. Hand-baste the lapped dart. I can almost hear the cries of dismay over the Internet. Yes, you should hand-sew this, it’s quick! I used orange thread so you could see where I stitched. You can stitch it right on (but not TO) the ham to maintain the dart shape.

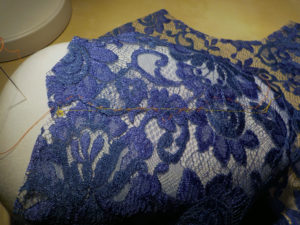
    Make tiny running stitches to hold the lapped lace in place.
  4. Change your sewing-machine needle thread to a color that matches the lace. Set the stitch to a narrow zigzag, like this:

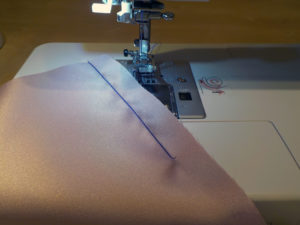
    Set your sewing machine for a tiny zigzag stitch.
  5. Sew from the dart base to the tip. The narrow zigzag should be a little bit within the overlapped lace edge, to sew through both layers. Sew very slowly and carefully, pivoting wherever necessary, to zigzag close to the lapped lace edge, appliquéing it to the lace layer beneath. After sewing to the dart tip, raise the presser foot and gently remove the work from your sewing machine. Leave the threads long enough to tie a knot on the wrong side at the dart point.
  6. Remove the contrasting basting stitches. Tweezers are helpful for this part.

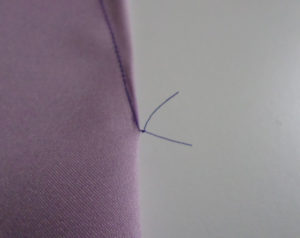
    Now that the appliqué is complete, you can remove the thread tracing and basting.
  7.  After knotting the thread, use your hand-sewing needle to draw the thread from the knot at the dart tip through the stitching leading up to it, then snip the thread. This hides the thread ends instead of having them poke out of the dart tip.
  8. Trim the excess lace dart value on the wrong side. Use the embroidery scissors to get within about 1/8 inch of the narrow zigzag stitching.

    Trim close to the zigzag stitching.
  9. Press the dart, right side down over the ham, and add a tiny drop or two of Fray Check to the stitching at the dart tip. This is just a precaution I always take to make sure the thread knot stays neat.

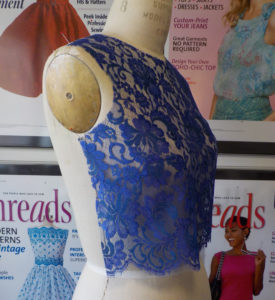
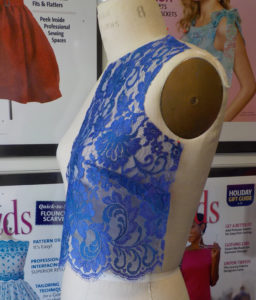
All set! The lapped and appliquéd dart isn’t too obtrusive. It doesn’t take away from the integrity of the lace.

Following this technique, the dart doesn’t detract from the overall lace pattern.

Repeat the process with the other bust dart in the lace, and you’ll be done with the darts on this top.

If you wonder at this point whether it is worth the effort to lap and appliqué a dart in lace, take a look at a dart sewn in the usual fashion:

What’s fine for fabric is not great for lace.

I know which one I prefer!

Get to sewing those darts, because next week we take on the separating zipper at the center back of the Simplicity SewStylish 8328 View C top.


Filed Under: sew-along, web extras

April 6, 2017 by Sewstylish

Sew-along Week 5: Start with the Darts

In many garment sewing projects, darts are going to be the first stitching you’ll do in the construction process.

Darts are wedge-shaped tucks that create shape within a garment. They are effective anywhere you want to fit body curves, such as at the bust, waist, and hips. Darts are not difficult, but there are a few tips to follow to achieve better results.

Dart Anatomy

First, let’s look at the parts of a dart, and I’ll share some terminology, so you‘ll know what I am referring to.


At the base, a dart is wide and takes up more fabric. That is where it fits a narrower part of the body, such as the waist. As a dart narrows to the tip, fabric is released to contour over fuller areas of the body, in this case, the bust.  

The Simplicity SewStylish 8328 View C top has bust and waist darts to create a flattering, body-skimming fit. You’re going to sew the darts in the underlay fabric as well as the lining, so that the layers mirror each other and have the same fit.

There are also bust darts in the View C top lace overlay, but we’re going to save those for next week. I’ll tell you why at the end of this post.

I have some great tips for sewing and pressing darts from past Threads magazine articles. I’ll show you the process on one bust dart in the top underlay fabric. The steps and advice will work for all the darts in the top’s underlay and lining.

Dimples are cute on babies, not on darts

Your goal is to sew darts that come to a smooth, tapered point. On the right side of the fabric, the dart point doesn’t end in a bump, dimple, or bubble. Proper stitching, plus pressing, will accomplish this.

  1. Make sure the dart legs are accurately marked on the fabric’s wrong side. I suggest, if you are new to sewing, that you trace the dart legs completely with an air- or water-soluble pen. it’s nice to have the marked leg to stitch along for accuracy. When you get confident, you can just mark points along the dart legs with pins. 
    Mark the dart legs on the fabric’s wrong side. We’re going to sew the bust dart – the horizontal one on the left.


  2. Fold the dart, right sides together, aligning the dart legs. Poke a pin straight through and check both sides to make sure the legs are right on top of each other.
    Align the dart legs, then poke a pin through to check the alignment. Please excuse my lack of a stunning manicure.
    That looks good. The pin poked straight through the other dart leg.


  3. The fold will pass right through the dart point. Place a few pins through both layers, perpendicular to the fold to secure it. 
    Perhaps I used more than a few pins. You get the idea.


  4. Move to the sewing machine. Select a straight stitch, 2.5 mm to 3 mm long. Position the needle right over the dart leg marking at the fabric edge. There’s no need to use a backstitch or locking stitch, because this seam allowance will be crossed by another seam. 
    Use a standard stitch length and start at the dart base.
    Lower the needle into the dart leg marking, and prepare to sew. Don’t forget to remove the pins from the stitching path as you proceed.


  5. Stitch along the dart leg marking until you are about ½ inch from the dart point. Pause, with the needle in the fabric, and adjust the stitch length down to 1 mm. 
    Reduce the stitch length when you get close to the dart point.


  6. Sew right off the fabric at the dart point. Lift the presser foot, and pull about 5 inches of thread out. 
    Stitch off the fabric at the dart point, then pull some thread from the sewing machine.


  7. Tie the thread ends in a knot, then trim them about ½ inch from the knot. 
    Knot the threads to secure the dart point.


  8. Now, it’s time to press the dart for shape. First, press the dart as sewn, like this: 
    Press the dart as it was sewn, to set the stitches and crease the dart fold.


  9. Next, press the dart over a ham to mold it. On the bust darts, fold the dart value down, toward the hem. Press the dart from the wrong side, then the right side, adjusting the dart position on the ham to form it smoothly. 
    Press the dart on a ham. On a bust dart like this, press the dart value down, toward the hem.
    Position the ham to support the dart tip while you’re pressing it into shape.


  10. Repeat this process with each dart necessary to shape the View C top’s fabric sections.

I have a parting tip for you.

  • I fold and pin each dart separately. I don’t think it saves any time to try and pin them all at once, then sew them. I’ve found as I sew dart one, a pin goes missing from dart 3. I think it’s fine to sew them one by one, carefully and accurately, then press them all.

Next week, we will sew darts in the lace overlay for the Simplicity SewStylish 8328 View C top. I’ll show you a way to lap and appliqué the lace darts, so that they just about disappear. No-one wants an obvious dart marring the pretty lace pattern on her top, am I right?


Save

Save

Save

Save

Filed Under: sew-along, web extras

February 14, 2017 by Evamarie

Sew-along Week 2: Lay Out a Pattern

Now that you know how to read a pattern, you’ll learn how to lay out the pattern pieces on your fashion fabric. This is an important step as most pattern pieces require specific arrangements on the fabric. For example, in this video you’ll see a skirt pattern piece that needs to be cut on the fold. This requires the fashion fabric to be folded and pattern piece placed on the edge.

You’ll want to be sure to pay close attention to the pattern instructions to get the results you want.

Filed Under: sew-along

February 14, 2017 by Evamarie

Sew-along Week 1: Read a Pattern

If you’re new to sewing, chances are that you’re also new to sewing patterns. Patterns can be purchased at your local fabric store as well as online. Don’t be intimidated by the plentiful choices available to you. Watch this video to learn two basic principles when using a pattern: choosing a pattern and reading the pattern envelope.

Filed Under: sew-along

February 14, 2017 by Evamarie

Sew-along Week 3: Fit a Test Garment

A test garment, or muslin, is the best way to assess a pattern’s fit. You try on the muslin, make any adjustments you need, and then use the muslin to make changing to your pattern.  Your final garment will fit and look better because you made a muslin first.

To start our sew-along of Simplicity SewStylish 8328, we’re going to share the process of fitting a muslin. In this video, you’ll see some common adjustments you might make to improve the fit.

Filed Under: sew-along, web extras

  • 1
  • 2
  • Next Page »

Get free eletters and special offers

Sign Up

SewStylish is a special publication from the publishers of Threads magazine.

  • Home|
  • Contact Us|
  • Privacy Policy|
  • Terms of Use|
  • Accessibility

© The Taunton Press, Inc. All rights reserved.